Indie game storeFree gamesFun gamesHorror games
Game developmentAssetsComics
SalesBundles
Jobs
TagsGame Engines

General Decker Question and Answer Thread Sticky

A topic by ahmwma created Aug 06, 2025 Views: 9,126 Replies: 277
Viewing posts 41 to 60 of 73 · Next page · Previous page · First page · Last page
(+1)

Hello! I need a little help figuring out how to specify specific rows to pull data from.

So basically what I'm trying to do is make a very simple text box that draws from a specific row in the graph, and then pastes the value into the field, then also takes the size data from the row next to it and applies it to the same field. 
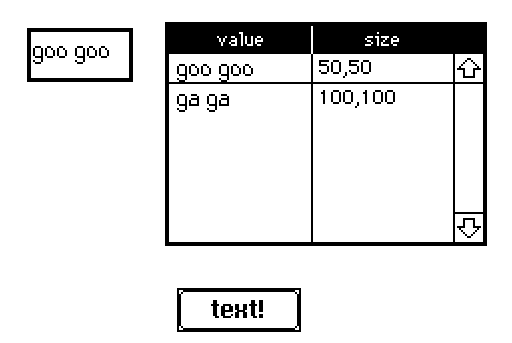
I've figured out how to get the text to paste and how to change the size, but right now the only way I know how to call for rows is through this random command.

on click do  
   field.value: random[grid.value].value 
end

I mostly just need to know how to call on specific rows though since I haven't been able to figure it out. I should be able to figure out the rest from there.
Developer(+1)

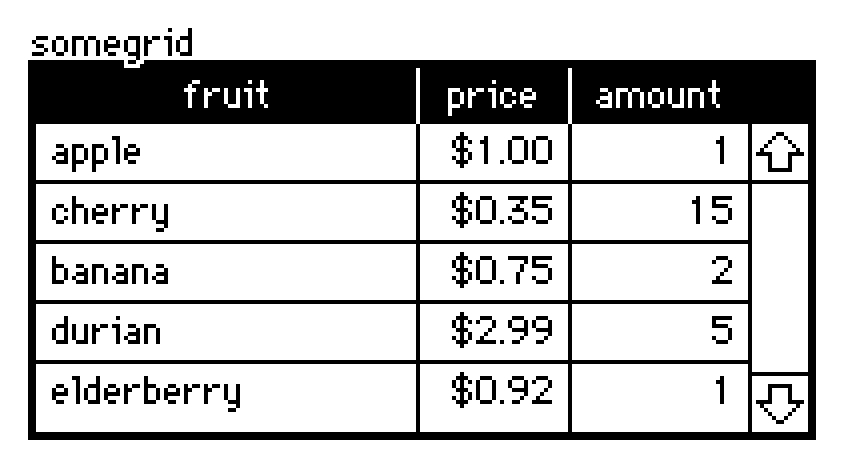
Let's say I have a grid widget like this:


The .value attribute of a grid widget is a table value.

Tables can be indexed by a string (a column name) to retrieve a column as a list, or by a number (a row number) to retrieve a row as a dictionary:

somegrid.value[1]
# {"fruit":"cherry","price":0.35,"amount":15}
somegrid.value.price
# (1,0.35,0.75,2.99,0.92)

Thus, if you want a specific cell, you can index by row and then column, or column and then row, whichever way you find convenient:

somegrid.value[1].price  # 0.35
somegrid.value.price[1]  # 0.35

Any questions?

(+1)

No questions yet, I've got it working now! Thank you for you help!

(+1)

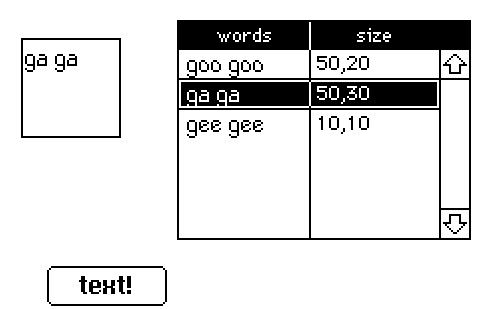
Ok actually I ran into a weird hiccup. I'm able to call on specific cells for text just fine, but when it comes to the size I'm just not able to get it to read properly. When I try to specify a cell under size, it glitches out the size of the field and makes it disappear. (code im trying below just as example to make sure im not messing up something small lol)

on click do    
   n:random[0,1,2]    
   field.value: grid.value.words[n]    
   field.size: grid.value.size[n] 
end

Weirdly, it "works" when I don't specify a cell, but it takes the first numbers of the first two cells in the column rather than the numbers from one cell.

on click do    
n:random[0,1,2]    
field.value: 
grid.value.words[n]    
field.size: grid.value.size 
end

I tried to put the size in a different grid, but I ran into the same issue.

Developer(+2)

I suspect that what's happening is you've placed e.g. the string "50,20" into a cell rather than a pair of numbers.

There are several ways of converting a string of comma-separated numbers into a proper list. For example,

"%i,%i" parse "50,20"
0 + "," split "50,20"
eval["50,20"].value     # (this is opening a walnut with a sledgehammer)

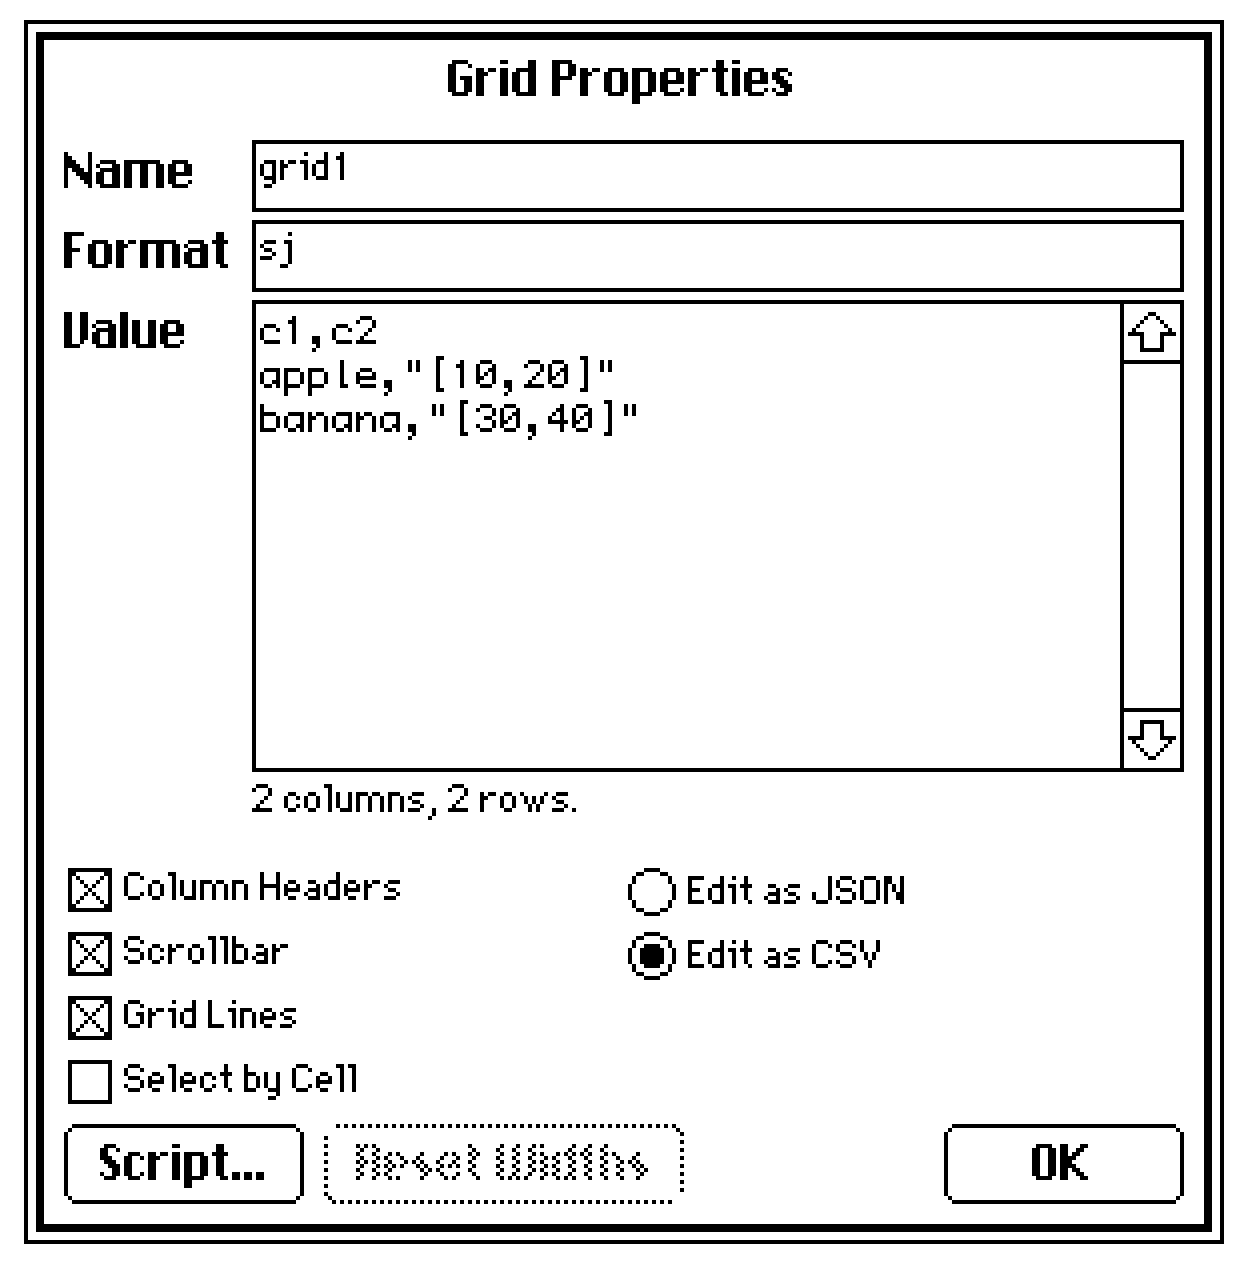
Alternatively, if you want to store structured data within a grid cell, you can specify a column's format as "j" (JSON data) or "J" (LOVE data, a superset of JSON) and then enter your pairs like so in CSV mode:


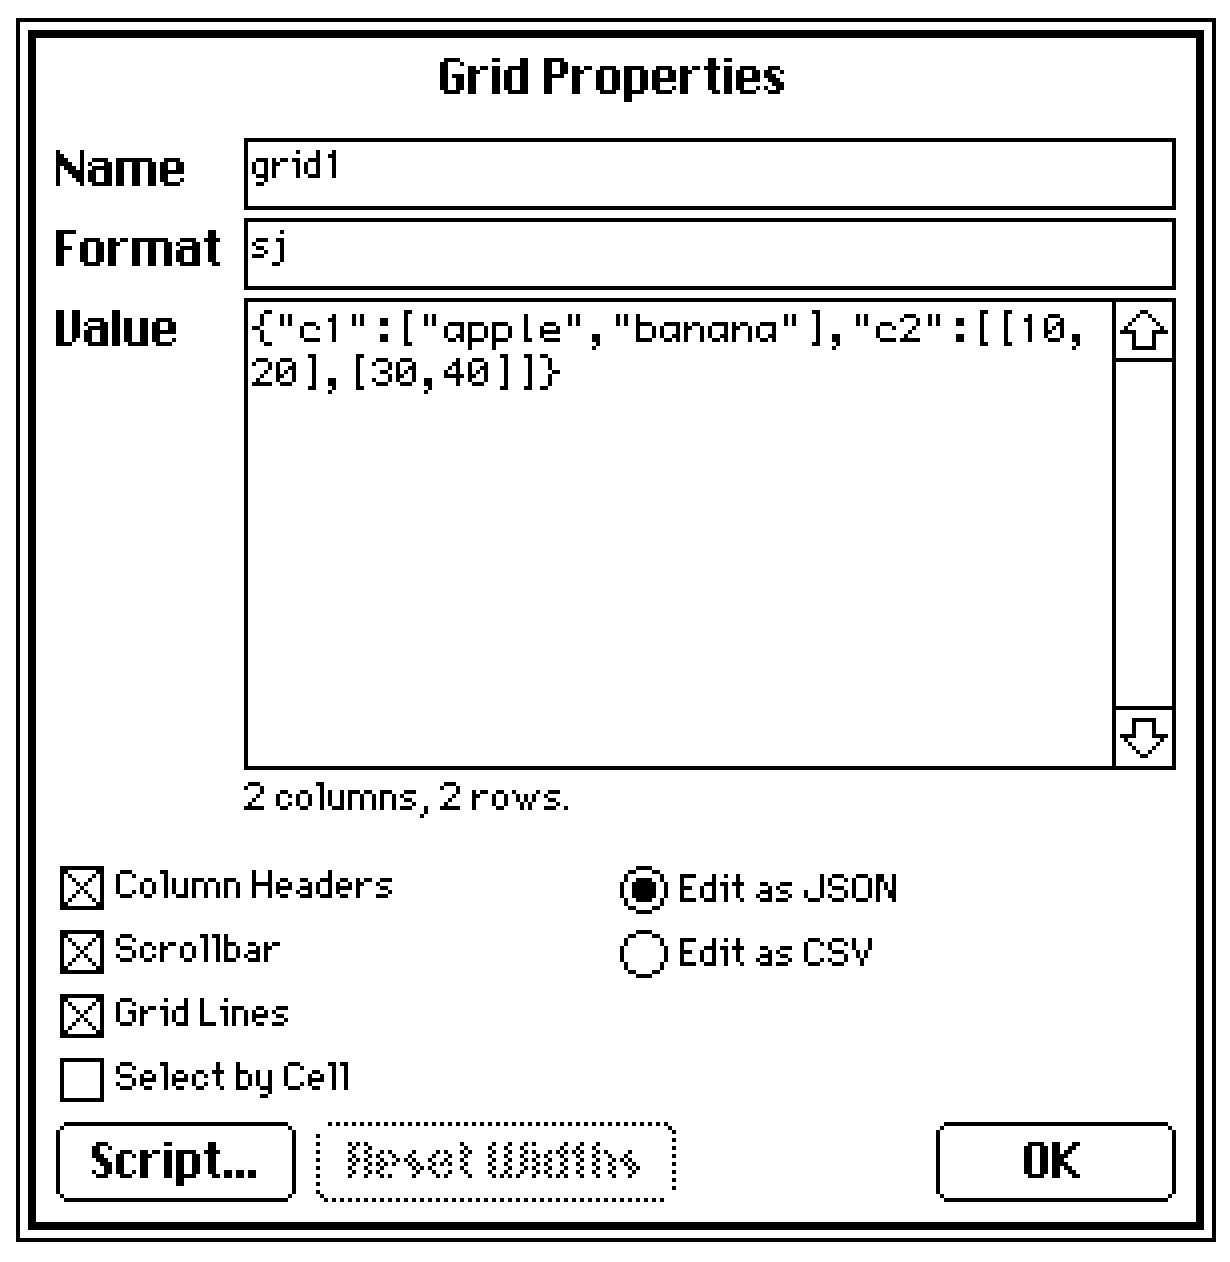
or like so in JSON mode:

(+2)

It works! Thank you!

Hi, I have a question about resolutions. For my current project, I have a height of 360, so that the project will go fullscreen on most screens. But I was wondering if the fullscreen effect on web-decker, that fills the screen no matter the resolution, can also be possible on native decker or is it a feature that's only on the web version?

Developer(+1)

Currently native-decker doesn't include a "stretch-to-fit" fullscreen mode.

(+1)

Thank you for the fast answer! I'll keep that in mind.

(+2)

locked myself out of the deck and the ctrl + U + L + D shortcut in native decker isn't working :') is it over for me

(1 edit) (+1)

Don't worry! Open up your file in a basic text editor (notepad or whatever you've got).

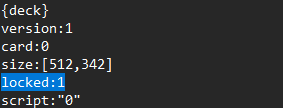
You'll see stuff at the top that looks kinda like this:


Change that line to say locked: 0 and you should be good.

(+2)

thank you for saving my bacon again!

(i'm not sure why but decker doesn't respond to hotkeys in expected ways)

(+1)

No problem! :D

With the unlock deck shortcut (CTRL + U + L + D) sometimes I forget to hold a letter until the end and that's why it doesn't work on the first try for me. 

And if I had to guess about other hotkey difficulties people might have (not assuming in your case, just general advice):

Sometimes people aren't familiar with the "^c" notation in the menus. Where the ^ means "CTRL on Windows and Linux"/"CMD on mac"

Or if someone is using web decker, I believe some of the hotkeys are effectively blocked by web browsers because browsers use those shortcuts too and they take priority.

If you're having trouble/weirdness that don't seem related to any of that stuff then it might be worth making a bug report about it?

(+2)

how do you hide the corners of a deck? i see the scripting syntax for it but i cant figure it out..

(1 edit) (+3)

This kind of thing is easiest to do with the Listener, I think. 

Go to [Decker > Listener] in the menu, type the snippet of code and then use Shift+Enter to run it. 

(Or you can just put the script inside a button and click it in interact mode, if that's easier!)

For anyone finding this post later, this is about the rounded corners you see at the edge of decks published online.

You can use deck.corners:0 to remove the rounded corners from your project (this works by setting them to pattern 0/transparent) or you can use another pattern index number instead of '0' to change the corners to that color or pattern instead!

(+1)

Forgive me if this has been asked before, but how do I change a buttons outline to a color? I found out how to make the inside a color, but not the outline. I've tried everything. If its not a thing, would you mind implementing it? Thanks!

(1 edit) (+1)

It's not currently possible... So, widgets can have one .pattern attribute at a time. In the case of basic buttons we have that one color + black (or whatever else you've changed pattern 1 to be).

But there's still some options to get the result you want.

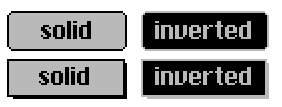
If this happens to be a visual direction you like... it might be good to know that the black lines and the inside color swap locations if you set the button to have inverted visibility:

And then there are the "Make a button look like anything" options. 

The first one is to have the appearance of a button as an image on the surface of the card and place an invisible button on top of it.

Or, if you want your customized button to have a specific click animation... you could paste images of your ideal button inside of the animButton contraption and use that. (It's the second contraption in the linked post)

If you want to copy an image of a standard button, select it and use [Edit > Copy Image] in the menu. This will copy the appearance of the widget into an image on the clipboard that you can paste anywhere else, to edit it or use it for other purposes.

If one of these options sounds good but it's unclear how to do something, please let me know.

(+2)

I apologize if this has been asked before, I looked and couldn't find anything. I also apologize if the answer is obvious, I'm dealing with a lot of brain fog so it's harder for me to figure things out these days. So, I want to have the palette change for a single card only so that a certain image displays correctly. Basically, I want the palette to change when you go to the specific card and revert to whatever it previously was when you leave. How would I go about accomplishing this?

(+1)

Hi,

So basically what you'll need is some code to change the palette when you go to that specific card, and change it back when you leave. This could be done in the button code or in the "on view" of the card. The "all about color" deck does have a bit of example code for doing this on the palette transitions page.

My palettefade module may be handy too, although it's primarily designed for doing fancy fade in/out transitions it does have some helpful utility functions for changing the palette. Hopefully should all be in the documentation but I'll try to go over some examples here.

So if you're using palettefade and you've added the module to your deck, you can get the current palette as a list of 16 integers by running pf.currentpalette[deck] in the Listener. Generally I'll take the output of that and make them like global constants e.g. in the deck-level script I'll have palette1:(16777215,16776960,16737536.... and so on for the various palettes I have.

Then when I want to change to a certain palette I'll use pf.setpalettte[deck palette1] and that'll change the palette. So I can have that in my "change to a new card" button or just in the "on view" so that however you got to the card it'll be at the correct palette.

If you want to get fancy then you could use the blackdip function in palettefade, that does a nice smooth fade to black and then fades up with the new palette, e.g. pf.blackdip[deck card2 30 palette2]. Or you can do something with transitions like in the all about colour deck example.

I hope at least some of this makes sense. Let me know if you're getting stuck though.

(+2)

Hello everyone! I have a question: D :Is there a code here that allows one sound to play immediately after the previous one finishes? Because when I use code like  play[""] , all the sound effects play and stop at the same time, but I want them to play one after another!

Developer(+2)

If you haven't already read it, I recommend checking out All About Sound.

In a simple linear script, like part of a cutscene, playing sounds in sequence is straightforward with sleep["play"]:

play["sound1"]
# do anything else you want while the sound is playing...
# ...
sleep["play"] # wait for all playing sounds (sound1) to finish
play["sound2"]

In more elaborate cases, with sounds playing while a deck remains interactive, you may want to rely upon the loop[] event or keep track of your own timer to trigger subsequent sound effects.

Does this help point you in the right direction?

(+2)

Oh my god, I totally forgot I’d seen it before! Thanks for the reminder!

(+2)

I tried using the sleep[] code, but I found that when I wanted to play these music tracks, the other buttons on my screen became unclickable. I need players to be able to click them while listening to the music, so I tried using random, but it causes random playback from the music list. I'm trying to find a code that can control the sequential playback of music without affecting the screen content, but unfortunately I haven't found it. Maybe I need help again.(PS:Due to network issues, I wasn't sure if that message went through, so I sent it again 😌)

Developer(+1)

If you want background music playing while a deck remains interactive, you will definitely need a more complicated approach than sleep[]; the discussion in this thread has some examples that may do what you need.

(+1)

Got it!

(+2)

Hello all.  I'm new to Decker.  I'm building a deck that has differently themed groups of cards.  I'd like to intercept field hyperlink clicks such that clicking a link from one card to another card within the same group navigates as normal, while clicking a link to a card in a different group plays a transition.  How can I achieve this?  Thanks!

Developer(+1)

Since you're overriding this behavior on many cards, it's easiest to define an overload for the link[] event at the deck level; see Deck -> Properies... -> Script... via the menu. I'll assume for the sake of this example that cards are named with a "group_cardname" convention, so we can use the portion of the name preceding the underscore to determine whether two cards belong to the same group:

on link x do
 on groupname x do
  first "_" split x
 end
 if groupname[deck.card.name]~groupname[x]
  send link[x]
 else
  go[x "BoxIn"]
 end
end

Make sense?

You may have a different method of distinguishing groups, like invisible metadata fields on cards; I'd be happy to clarify how to adapt this approach to your deck, if needed.

(+2)

Thank you.  That was very helpful.  Here's what I ended up using:

on link x do
    target: deck.cards[x]

    if target
        if !(target.widgets.channel.text = card.widgets.channel.text)
            go[x "Wink"]
        else
            go[x]
        end
    else
        send link[x]
    end
end

(+1)

What about go["Back"]?  I want to keep the simplicity of go["Back"], but need to ensure that my transition plays when going back to a different card group.  Thanks again!

Developer (1 edit) (+1)

Hmm. Tricky.

How about something like this?

on link x do
 here:deck.card
 send link[x]
 there:deck.card
 if !(here.widgets.channel.text=there.widgets.channel.text)
  go[here]
  go["Back" "Wink"]
 end
end
(+1)

Sorry for the confusion.  I have links and buttons in the mix.  Your answer solved the link issue.  However, I also have buttons with the Back action.  I need to make sure that if a back button from a channel one card would go back to channel two card, it plays the transition.

Developer

In that case you might want to consider giving the buttons a script that delegates to your link[] logic:

on click do
 link["Back"]
end
(+3)

Hey! I just discovered Decker and I think it's awesome. I have an idea for a game but I'm not sure if Decker's the right software for it. 2 questions:

- is there any way to give players the option to save and load their game (while in locked mode)? I'd like to make a game that takes a while to finish (with lots of stuff to read) so without saving, probably noone would ever reach the end of it. I don't know how to code, though 😇

- that being said; I'm not sure if a long game would be possible to make with Decker? I'd love some kind of point & click / vn hybrid with lots of branching. When testing out Decker I got the impression that this would get too complicated for the card system as you have to manually choose the card you're linking to. Is there any way around this, if you have, say, hundreds and hundreds of cards?

Any help would be much appreciated. I'm already in love with Decker, I'm so psyched to make something in it! <3

(+2)

Alright. So first up, you don't know how to code YET! You may yet learn to code. I think what you want to do is doable, if you are prepared to start dabbling in a bit of code. And as you get more comfortable you can try out more stuff

If you make a button and hit the "Script..." button, you'll see this pop up

on click do
end

In between is where we can put code that we want to run!

In terms of saving, you can save out a copy of the deck using the code app.save[], that's basically the same as hitting the save menu when you're unlocked. So in a button you can do

on click do
 app.save[]
end

With some more advanced coding, there are some other ways of saving out stuff but we'll start simple for now. But if you want a more complicated example, my game The Wayward Mage uses a custom save format that basically saves out the game state in a custom file.

A long game is ABSOLUTELY possible. It sounds like you're looking at basically doing branching purely on cards. If you're finding the "picking the next card to branch to" tricky with having to manually navigate to it, this is another thing that can be easier with code.

If you set up a button to go to a card with a transition, and then open its script up you will see something like this.

on click do
  go["card1" "SlideLeft"]
end

It might be easier, with lots of cards, to basically use this but change the names of the cards manually in the code, like if you know you want to go to a card named "branch2a" you can just write that into the code.

If you're doing visual novel stuff, it could be easier to do things without needing a separate card for each screen. If you use the dialogizer and puppeteer modules that come in the Decker examples folder, they basically let you write and run a whole visual novel script with sprites and a background and text and such. So you're not using a whole card for just one screen of text - you basically just have a card for a background, and some cards to store your character sprites. And then a hidden field somewhere to stash your script. It's again a bit of simple coding, if you look in the dialog.deck and puppeteer.deck files in the Examples folder they'll have documentation.

Finally, if you haven't checked it out definitely take a look at Phinxel's Field Notes, it's a very thorough Decker tutorial that'll teach you some simple coding things among many other Decker tricks, and it doesn't assume any existing coding knowledge. Another thing I've found helpful is pulling apart other people's decks to find out how they did things.

(+3)

Wow, how do I even reply to such an in-depth answer?? Thanks for helping out, friend! 😊 Just so you know, I'd really like try out some coding so that doesn't bother me. I've made stuff in Twine (only Chapbook though, the easiast variant, but I really enjoyed that!). Thanks for the tips, I'll definitely try them out <3 It's especially helpful to know that I can use code to refer to different cards instead of choosing them manually, that's really good to know! This shows I have no idea to what extend the software can be used.

I'm not sure whether the visual novel module would be the right choice but I'll try it out. I did read the phield notes, which were super helpful (and not to forget: darn cute)! 😁 

(By the way, thanks for sharing your game! I'm sure I can learn a lot from it 😋)

Developer(+2)

Just in case you didn't see it already, we have a library available for using Decker in concert with Twine: Twee.

In the simplest cases you can write normal Twine passages using the "Ply" story format, which is like an extremely stripped-down version of Harlowe, export a .twee file and pop it into a "plyPlayer" contraption; no other coding required. With a little scripting there are many ways to make a Ply story interact with a deck or vice versa- change cards, display visuals, play sound effects, etc.

I hope you'll find that Decker is a very flexible digital arts-and-crafts medium that you can use for a wide range of creative projects, tools, toys, and games. Welcome to the community!

(+2)

No, that I hadn't discovered yet, thank you so much! Sounds really interesting. I'll have to dabble around in it a bit to see what works best! At this moment, I think using the card system would be ideal, but I'll need to get to know Decker better first 😁.

The game I envision goes something like this: you have to find the way through a story which is built up by different characters' point of views. The story only progresses after you met certain conditions, like having visited a location of having unlocked a core memory.

When you select a character, you can visit certain places on a map which are not always accessible to other characters. You also have access to their thoughts and memories which you can explore, and make certain choices that will shape what happens after. (I've already made a thorough schematic overview of all the choices, consequences and endings.) 

I like the idea of cards with reading material which lead to several other cards, because this would become some kind of reading puzzle to the player. They'd have to go search deep into the story to find a way to progress, while finding out secrets and lore. But maybe the visual novel module would come in handy here, I'll have to see. Other suggestions are still welcome of course! 😊

(+2)

It's great that you've got it all planned out in advance, it can make stuff a lot easier.

If you've got different characters that you select and you're needing to track progress, there's ways to do that fairly easily. I'll try to explain how you might be able to accomplish this, without having to have like a separate set of cards for every possible path.

Let's say you've got a card that's a certain location, and maybe there's one door that you only want a certain character to be able to enter, and another door that you can only enter if you've unlocked it, or something like that. Like in general there's a certain state of the game that you need to be able to keep track of, to know who you are and what you've done so far.

I've found the easiest way to handle this is basically to have a separate hidden card, that's basically filled with checkboxes (and other widgets) that I can use to keep track of and store all this sort of "state" info. Like I might have one that says what character you are currently, and one for each task you might have already completed,or something.

Then on the location card, you can refer to these checkboxes to decide what happens when you click something. Like either entering the door or popping up a box saying it's locked.

The pages in Phield Notes on Referring to Other Widgets and If-Else Statements are probably the best explanation of how to do this.

(+1)

Making notes ✍🏼 Thank you! That's an interesting approach, though I'll have to check if it can be used for what I was planning on doing. Because each character gets a whole different array of options (thoughts, dialogues etc.) when visiting a location. It's not like there's 1 path that they all follow. For example character A could try to enter a door but character B gets haunted by memories and ignores the door.

(+1)

Yeah, an approach like this would work for exactly that. Like you code the door so it's like "if character A, then enter the room, if character B then pop up a message about being haunted by memories". So you can have the one card with things coded to behave differently depending on which character you are at the time.

(+2)

Alrightie! I'll try it all out, thanks again for helping a noob out <3 This community must be one of the nicest on the internet! (The Twine community as well 😊)

(+1)

Hello ! Was wondering how to prevent to change slide with the keyboard ? 

Developer(+1)

In "Interact" mode, pressing arrow keys fires a navigate[] event to the current card. The default navigate[] event handler flips between cards:

on navigate x do
  if x~"right" go["Next"] end
  if x~"left"  go["Prev"] end
end 

But you can override this behavior in the deck-level script to do nothing instead:

on navigate do end

See "consider a custom navigate event" here for another example: https://ahmwwmaaa.neocities.org/decker/phield-notes#publication

(+1)

Hi! I have a question about the dialogizer module. Is it possible to have buttons on a card that could be clicked while the module is running? I'm trying to find a way for the player to be able to either quit the game or mute sounds during dialogs, if possible. Thanks!

Developer(+2)

Dialogizer runs in a "blocking" manner; Decker won't process click[] events or other interactions with ordinary widgets while Dialogizer is active, so you wouldn't be able to furnish that kind of functionality with ordinary buttons on a card.

You could, however, use the animate[] event that Dialogizer continuously emits while dialog boxes are open, in combination with the Pointer interface- which provides live-updating access to the state of the user's pointing device- to explicitly detect clicks on extra buttons.

If pointer.start and pointer.pos are within a given rectangle and pointer.up is truthy, you'll know the "button" corresponding to that rectangle was clicked. You could even physically have buttons with click event handlers on the card if you want. Presuming a button called "menu", you might have an animate[] script something like:

on within pos rect do
 min(pos>rect.pos)&(pos<rect.pos+rect.size)
end
on animate do
 if within[pointer.start menu]&within[pointer.pos menu]&pointer.up
  menu.event.click
 end
end

Make sense?

Note that this technique works best when a dd.ask[] dialog is open; ordinary dd.say[] dialogs will automatically advance for any pointer click irrespective of what else happens in animate[]. If you really want fine-grained control here you might need to make minor alterations to the dialogizer module itself. I'll ponder this kind of use-case and possibly make some enhancements to the module in the future.

(1 edit) (+2)

Yeah, I had a feeling it was something that needed to be changed within the module itself in order to work. I'll try to make something work with the exemple you provided, thank you!!

edit: Just tried it and works pretty much as I wanted to, thanks! 

Developer(+2)

Just as a followup, Decker 1.66 makes this technique a tiny bit more powerful:

By altering app.cursor it's possible for blocking scripts to override the appearance of a mouse cursor. Setting

app.cursor:"point"

While the mouse is over a clickable "button" (real or simulated) will improve the illusion that there's a real widget there.

The new gamepad interface opens up additional input options, too: the "left"/"right" directional buttons and the "cancel" button aren't used by Dialogizer, so any of them could be used to exit a game, mute sound effects, summon a menu, etc, via the keyboard or a physical game controller.

(+2)

That's great! Thank you for the update, it will be really useful!

(+1)

I have a Prototype that seems to have a transparent background. At least, when I go to View > Transparency Mask I see the background look transparent.

When I add this prototype as a Contraption to my slide, the background is covering up my drawing. Is there some way to make the background of a contraption transparent?

Developer(+1)

You'll need to set the contraption instance itself to "Show Transparent".

You can do this manually, via the menu ("Widgets -> Show Transparent") or programmatically, by giving the contraption an internal script which initializes this attribute in response to the view[] event:

on view do
 card.show:"transparent"
end
(+1)

Ahah! Great, thank you so much!

Hey, IJ!

I updated to 1.66 after more than a year using 1.5 and something, and it killed my old decks that made use of Twee.

This showed up:

The module "twee" failed to initialize: 'trim' is a keyword, and cannot be used for a function name.

What could be done? Did I miss some instruction or updating procedure?

Thanks!

Developer

You'll need to upgrade your decks to the latest version of "twee", too, and possibly do the same for other modules.

I recommend reviewing the release notes for the intervening releases, which include detailed information about any breaking changes and mitigation steps.

Is there a way to do a guard statement or an early return in Lil?

I feel like I missed something, but I haven’t seen anything about it in the Lil or Decker documentation.

I have a function like:

on view do
 if frames_since_last_step < 10
   # stop the function execution here since its not time
  return
 end

 # do the next animation step
end

Oh hm, maybe I can use sleep[10] instead of what I was trying to do here?

Still curious about writing guards for other validation though.

(+2)

I don’t believe so, no. Even though it looks a bit like Lua or Python, Lil’s functional-language heritage means there’s no shortcuts, no return or break or continue. This can make some things more difficult, but once you get used to thinking in that style you’re writing much more vectorisation-friendly code, and Lil’s vector operations are much more efficient than regular loops.

(+1)

Cool, thanks for sharing! Excited to vectorize my brain properly as I go.

Developer(+1)

Lil doesn't have a keyword for performing an early return from a function, or otherwise an equivalent of break/continue for each/while loops or a throw/catch exception mechanism. All control flow is strictly structured and local.

For some situations where you might want to guard a clause, you can take advantage of the fact that if ... elseif ... else ... end structures, like all control structures in Lil, are expressions which return their result:

C:

int foo(){
 if(cond1){return a;}
 if(cond2){foo();return b;}
 bar();quux();return c;
}

Lil:

on foo do
 if cond1 a
 elseif cond2 foo[] b
 else bar[] quux[] c
 end
end

I encourage breaking functions down into fairly short definitions. You can nest function declarations within one another if you need "helper" functions that are only used in one place, and those nested functions will close over the lexical scope of their "parent" function.

(+1)

Thank you for the advice! I think the tip to define many more functions is where I should start. Excited to see how to adapt to this pattern.

(1 edit) (+2)

Hi! I have zero coding or programing experience but I love the look and experience of Decker so much that I'm determined to use it to create an interactive artist profile for myself as a bedroom musician. That being said, I will have many questions; most of which I have already googled but not gotten an understandable answer to. 

First question, how do you make the text "type out" in the box like a video game? 😅

(+2)

Hi there! Welcome!

I'm going to start with two existing resources which do similar things along these lines so check them both out let me know if either of them do the thing you want.

An option that can make text appear word-by-word in a dialog box: the Dialogizer module (specifically this page's demo which shows the text showing up word-by-word)

An option that can make text appear letter-by-letter in a text field: the Typetext module. (Demo on the main page)

Are either of these similar to what you're looking for? I can write out instructions for how to use either of them.

(+2)

Hello thank you! Yes these are exactly what I had in mind. I can see my project using both actually in different ways.

(+2)

I'm a little sleepy, so I'm sorry if this doesn't totally make sense but I'll take a stab at writing out instructions anyway. If you get confused let me know with what part and I'll try to clear it up.

In both cases these are a kind of Decker resource called a Module. These are-written bundles of code that do specific things that you can transfer into your projects and it's all set up to be convenient and reusable.

You'll probably already have a copy of dialog.deck in the examples folder that comes with downloadable Decker. But you'll also want to download a copy of typetext.deck from the link above. Then you'll have the modules on your computer and you'll have an easier time transferring them to your project.

How to transfer resources

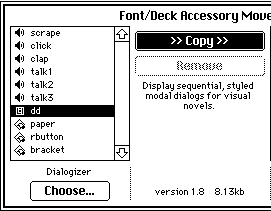
While you have your new project open (or an empty deck that might become your new project) use the menu at the top to go to File > Resources. Use the Choose button to select one of the decks files that you want to transfer a module from. This will create a list of all the transferrable resources on the left, and you can choose the ones you want and >> Copy >> them into your current project.

You'll want to get the "typetext" module from typetext.deck and the "dd"module  from dialog.deck.

How to use typetext

When the typetext module is in your deck you can use it in scripts to make a section of text type out letter by letter into a text field. The easiest way to test it out is by putting your script in a button so you can click the button and see if things happen how you want them to. 

I'm going to walk through the example code from the typetext module to explain what each part means, and then you can try playing around with it yourself.

Imagine that this is the little bit of code inside a button:

on click do
 typetext.typetext["hi there, look at this being typed out" targetfield 5 "" "lowpip"]
end
"on click do" and "end" are the basic structure of the usual click event code inside a button. Anything you want to happen when you click the button should go between those two lines.

The typetext.typetext part is just telling decker to look at the typetext module and use the typetext function (I think they're only the same word because this module only has one function).

 Inside the brackets is where we put our arguments, meaning the instructions we want to give typetext about what to type, where to type it, etc.

The text inside the quotes ("hi there...") is the text that will be typed out typed out. 

targetfield is a name I made up for a text field that we want the text to be typed into. (It doesn't need to be called that, it just need to exist and have the name of the field match the name in this part of the code)

5 is the speed, but specifically it's how long do you want typetext to pause to take between letters. In this case it's 5 frames. Try different numbers if you want!

The "" is an additional argument you can give it, if you want some text to be there already before the typing-out effect begins. You can leave this as two quotes with nothing in it if you don't want to use them.

"lowpip" is the sound effect that plays when this particular example runs. You'll need to transfer this sound effect from typetext.deck if you want to use it. It works just like how you got the module. You can also set up a different sound to use here or you can ignore this if you prefer silence.

My suggestion from here is to play around with it. :) And let me know if you run into any difficulties.

How to use Dialogizer

The Dialogizer example deck (examples/dialog.deck) is also full of instructions for how to use this module, but I'll write out a simple version so you can refer to this and the example deck and hopefully one or both of these explanations will make sense.

I'll use a simple button script example again:

on click do
dd.open[deck]
dd.say["Hello, World!"]
dd.close[]
end
When this button is clicked the dd module is told to open[] (get itself ready, in a sense), then told to say[] ("Hello, World!" will appear in a dialog box) and then close[] itself, because it's done. 

This is the basic code of Dialogizer, though there are some ways to make it even easier to write big scenes and also ways to style your dialog boxes which I'll explain next.

But to make sure things are set up right, just try putting that code up there in a button in your project and click it once. If the dialog box popped up on screen and displayed the text then we can move on.

Easier writing with Dialogizer

If we switch that code above to say dd.say[story.value] instead of dd.say["hello"] it can display a whole scene that's written in a more natural way inside of a Field widget.

story.value effectively tells dd to look at the contents of our field widget called story and dd.say[] will treat it as multiple lines of dialog if there are blank lines between lines of text.

Let's say this is the text inside of a Field widget named "story":

Me: Hello, World!
World: Oh, hello there...
Me: Aaah! The world is saying hello back!

This should make a series of dialog boxes appear until it finishes the whole scene written in the field. Hopefully this will all make sense if you give it a try.

Styling Dialogizer

This might seem a little more confusing at first. 

We need to rewrite dd.open[deck] to add another argument: we need to tell it the name of a specific style that we're going to define. You can name your styles pretty much anything but I'll use the name st in this example because I want to create a style that has slow text.

I'm going to change our dd.open[deck] line to say dd.open[deck st] instead.

But we also need to define what st means. In a big project you'll probably want to put your style information 'higher up', maybe in the deck level script (happy to explain this later!) so any button or script in the project can look up and see what st means... but for this practice button we can define it in the same button where the dd script lives, just above the "on click do" event handler.

st:()
st.speed:10
on click do
dd.open[deck st]
dd.say[story.value]
dd.close[]
end

Now when we click the button the text in our "story" will play out slowly. (It will take 10 frames per word. Lower numbers will be faster.)

There are a bunch of other ways to style a dialog box that are explained inside of dialog.deck, by the way! Once you understand the structure that the dd module uses it gets a lot easier to figure out what all the examples are doing, and you don't need to be able to write much code at all to start making things.

I'm sorry for being very rambly in this post but I hope this helps you get started playing with these two modules!

(And if you're interested in visual novel-type stuff, Dialogizer works very well with another module named Puppeteer which can handle character sprites.)

(+1)

Hello everyone!👋 I’ve been tinkering with something new lately — learning how to work with Canvas to level up my visual novel framework. I’m planning to make a puzzle game inspired by Decker’s Sokoban tutorial.

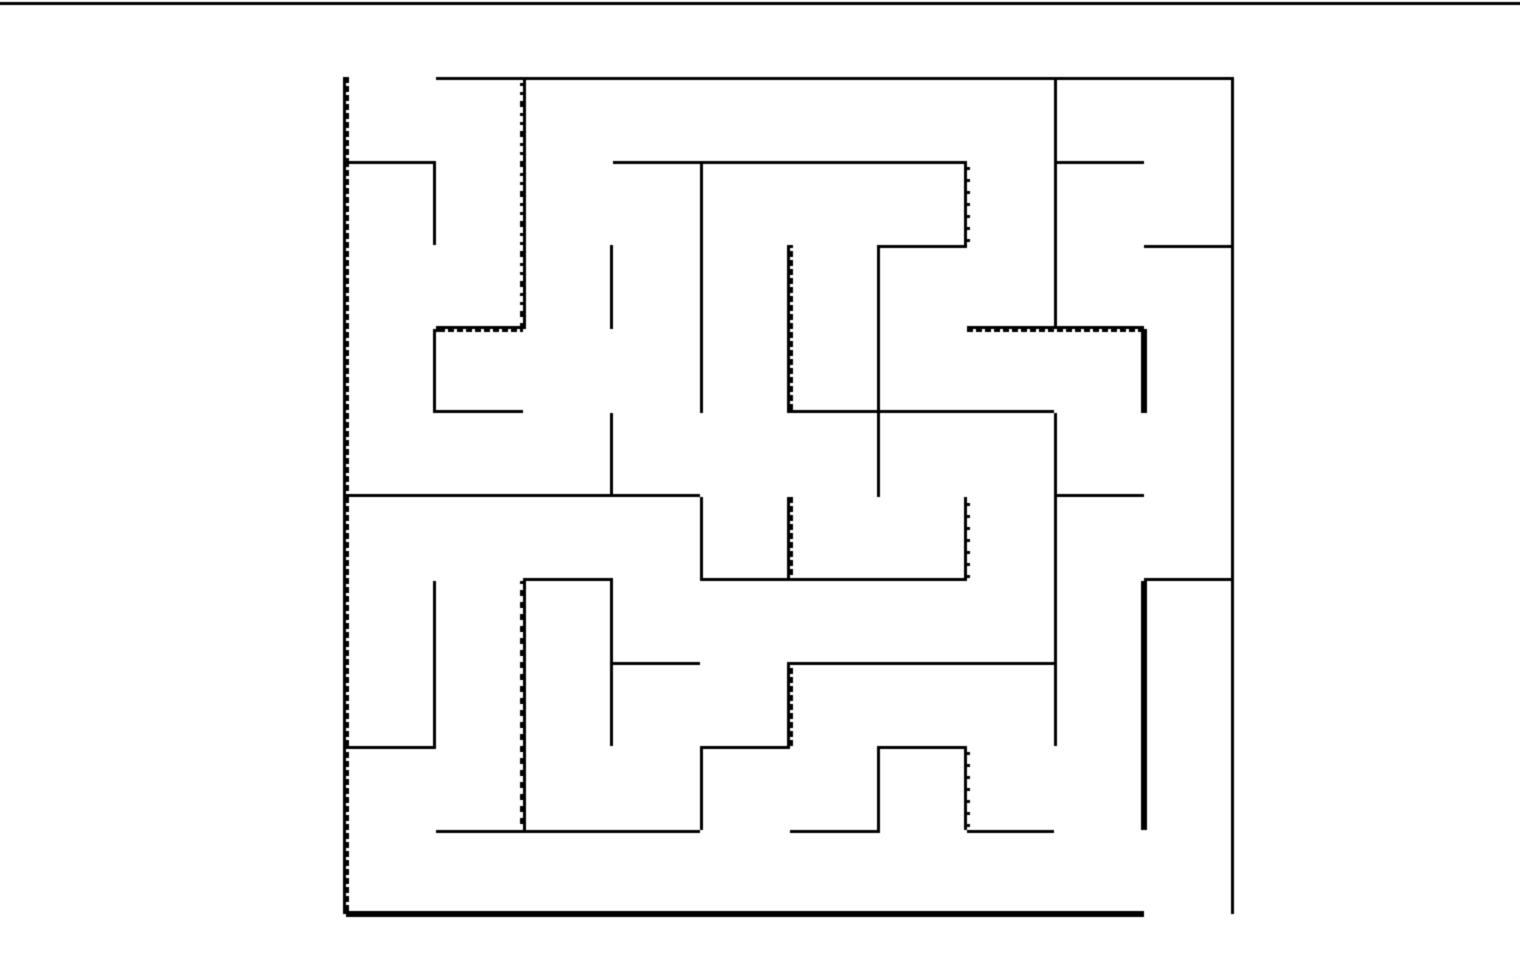
Yep, it’s a maze stage-clearing game. The catch is my maze is one single, irregular continuous shape; there aren’t separate, split wall tiles. My plan is to add invisible rectangles around every drawn line to handle collision detection.

I’ve got most other parts figured out, like the player character. But I’m stuck on how to code wall collision logic and get it functioning properly.🙏 So I try to ask for some help again!Maybe hands-on step-by-step tutorial😅

(+1)

The whole maze is drawn as one single continuous graphic with no separate wall segments. The main issue is I haven’t found a proper way to implement collision logic for this kind of artwork 🤔, and this problem even extends to my buttons as well.

(+1)

I also plan to make a long horizontal 2D interactive platformer game later on. Besides WASD movement, I want to bind extra keys such as E and Space, plus implement enemies with their own AI scripts. I’m wondering if all of this can be done within Decker? This project only exists in my head for now; I haven’t attempted building it yet.🕹️🧩

Developer(+1)

Everything you're describing sounds possible in Decker, though some of your ideas will require quite a bit of scripting!

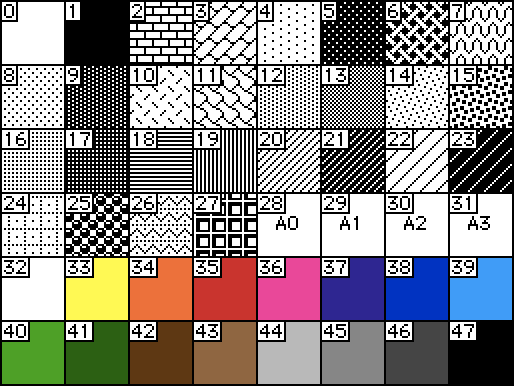
One idea for representing complex collision maps is to draw the impassible walls using a specific color or pattern. You can then copy a chunk of the card background and use image.hist to see if any pixels within that chunk contain the collision color:

if card.image.copy[pos size].hist[collision_pattern]
 # ...
end

You can use a vibrant color during development, and then replace it with a color that looks identical to black (or otherwise) when the maze is done to hide your collision boundaries from players!

There are some constraints on which keys you can use, but the gamepad interface should be handy for building any sort of action sequence or minigame.

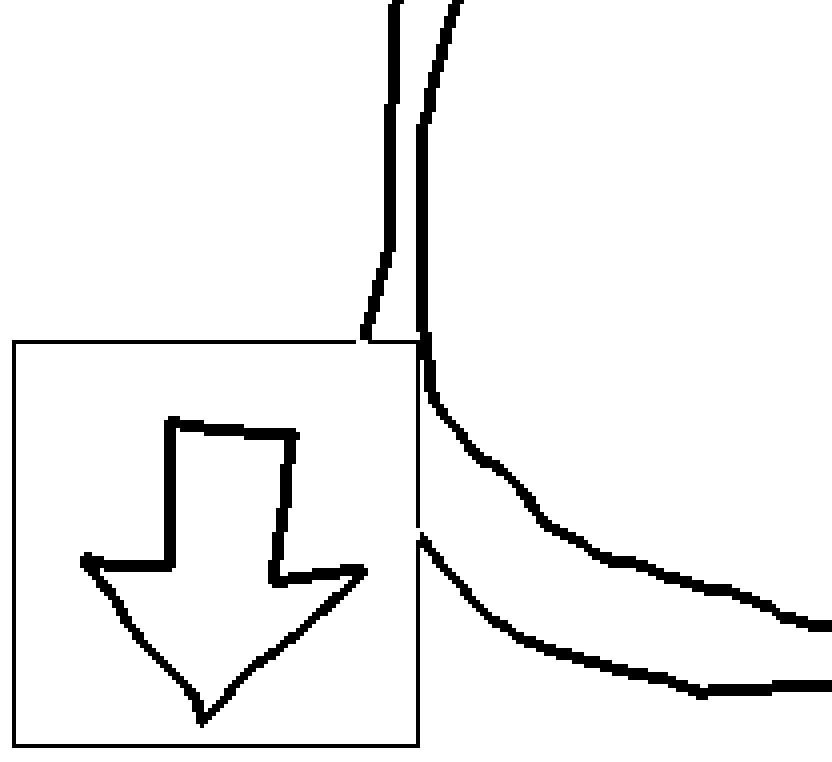
My maze is rendered on a canvas roughly like the graphic shown below.So its mean I can assign a specific color to black and use those black pixels as impassable walls? (Hopefully I didn’t misinterpret how this works!)

I’m also curious about how wall collision detection is implemented in Sokoban. I’ve tried looking into its underlying logic to apply the same idea elsewhere, but I couldn’t find relevant code/methods and make sense of what I did find, and maybe i don’t even know where or how the collision parameters are configured in the first place.lollll

Oh wow! I totally forgot to hit the reply button omg 😂

Developer(+3)

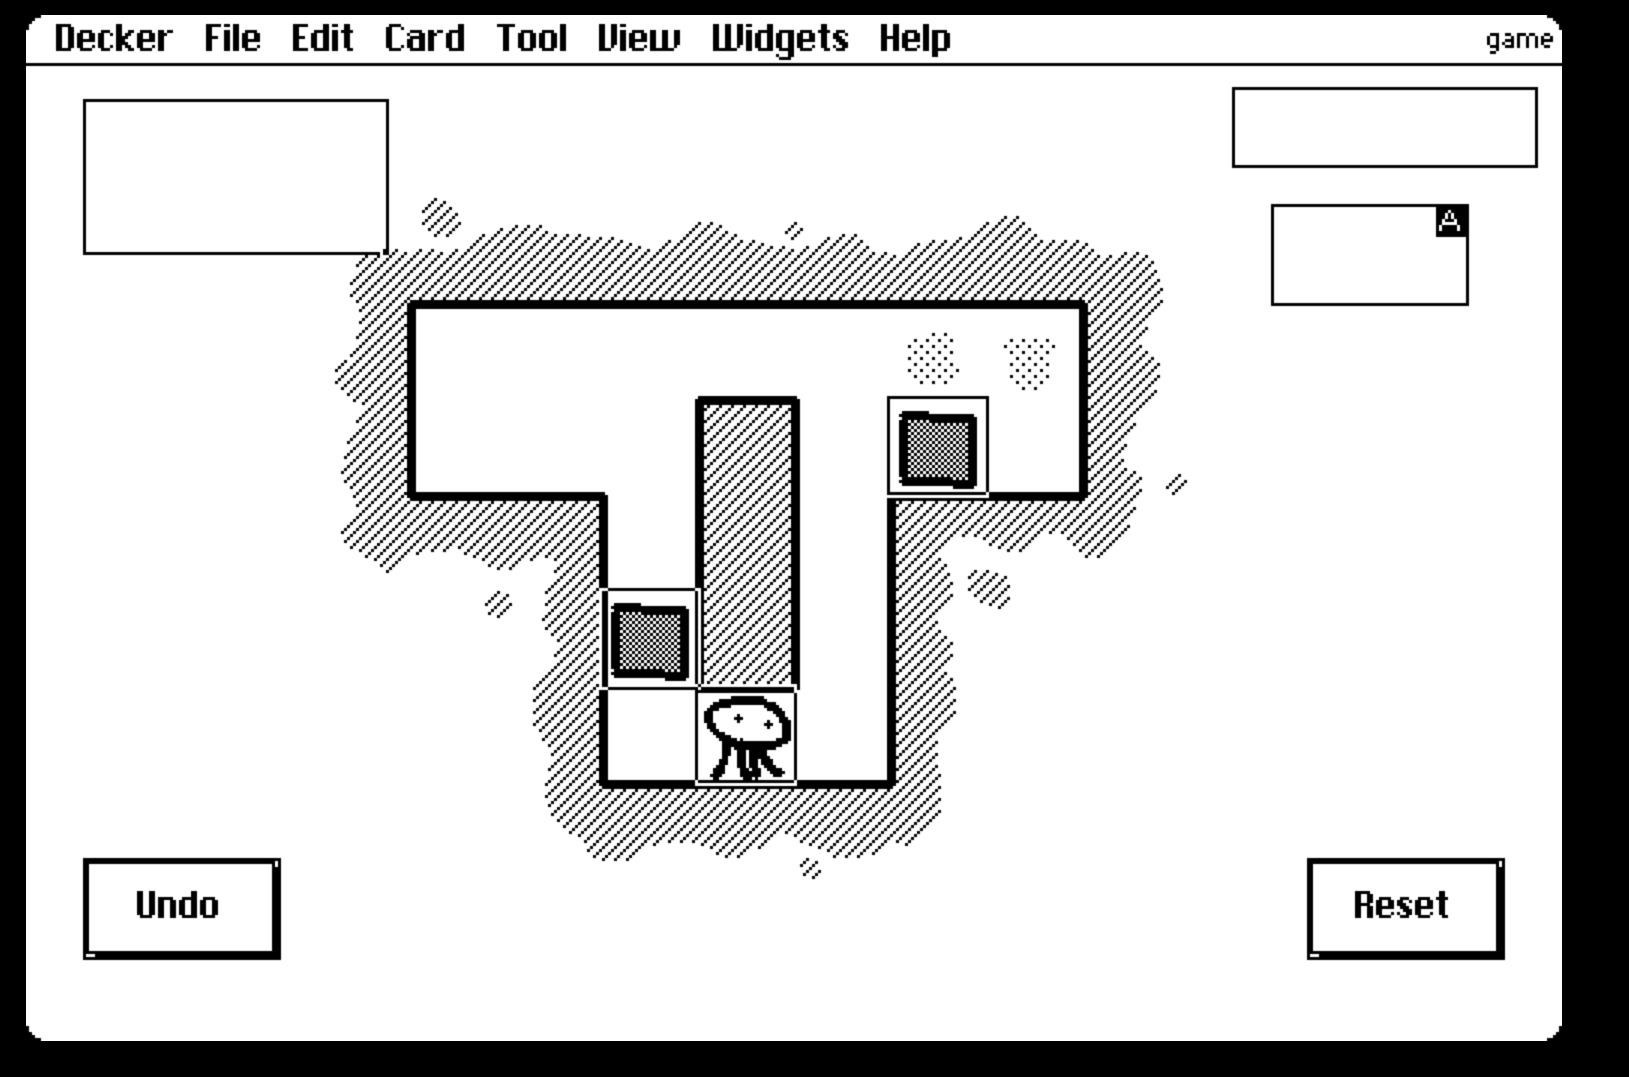
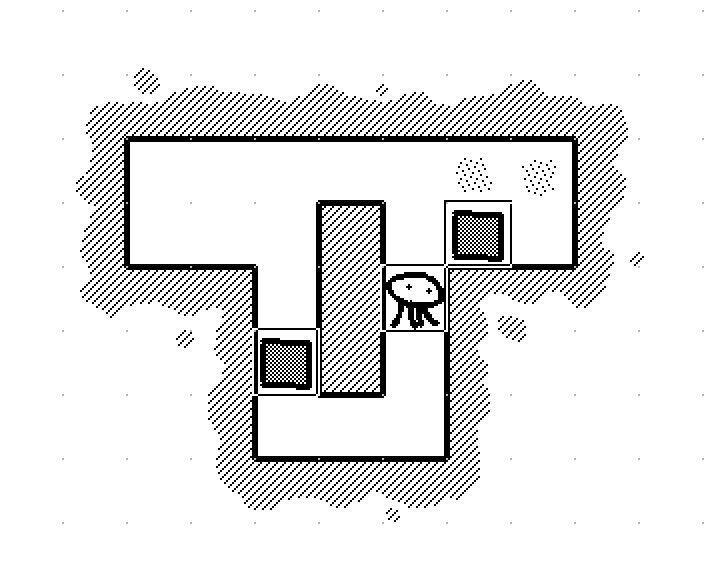
Decker Sokoban uses the general strategy I described above. Level elements are aligned to a 32x32 tile grid, and every tile of the card background of a level that contains any pixels of pattern 20 (that diagonal slashed pattern) are treated as "solid"; note how I always use a layer of this pattern when drawing level boundaries:


Most of the work happens in the script of the card named "game". Paraphrasing,

CELL:32 # grid size
on isTile pos tile do
 (card.image.copy[pos CELL,CELL].hist[tile])>0
end
on isWall pos do
 isTile[pos 20]
end

The "isTile[]" function is also used to identify "goals", where blocks are supposed to end up on each level, identified with a different pattern.

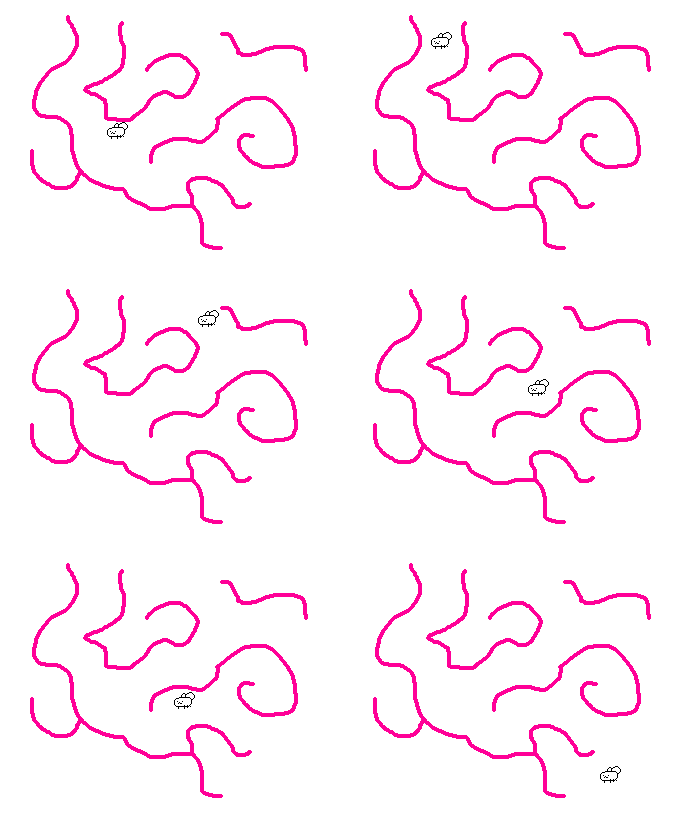
Collision and movement animation/physics in games is a very deep and complex realm, but here's a simple demo for you to play with as a starting point: an animated canvas that moves around in response to arrow keys using the gamepad interface, and cannot move past pattern 36 (pink).


on view do
 each in range 3
  if !card.image.copy[me.pos+gamepad.dir me.size].hist[36]
   me.pos:me.pos+gamepad.dir
  end
 end
end

As a paste-able example:

%%CRD0{"c":{"name":"home","image":"%%IMG3AgABVgZAgHBILBqPyKRyyWw6n9CodEqtWq/YrHbL7Xq/4LB4TC6bz+i0es1uu9/wuHxOr9vv+Lx+z+/7/4CBgoOEhYaHiImKi4yNjo+QkZKTlJWWl5iZmpucnZ6foKGio6SlpqeoqaqrrK2ur7CxsrO0tba3uLm6u7y9vr/AwcLDxMXGx8jJysvMzc7P0NHS09TV1tfY2drb3N3e3+Dh4uPk5ebn6Onq6+zt7u/w8fLz9PX29/j5+vv8/f7/AAMKHEiwoMGDCBMqXMiwocOHECNKnEixosWLGDNq3Mixo8ePIEOKHEmypMmTKFOqXMmypcuXMGPKnEmzps2bOAGQIJGzp5KdO30KLQKU59CjRY8iBap0aFGjTXsmjRM0qsGncKZaJYi1TdetXLWq+Qp2oFg0ZMsKPHuGrVqAac24ffsvLpm5dP3hDbM3776+XwD7xWdXjODB9w5vUUzpKVPElwqDYSzJsWTIjShf0QzJ8mXMij5zEW3JM2fQgE5TUd2YNWo+rqPErjz79Z3aTnB3fmw7M+8yuh+R7p36913jp4ITf6P8Z3NGw5fDRj7mOXTq0gVZRxKdU/fst7EbFj9qO/jjVdGaR/Rdiun35M+3z7KeffzV8PPPh1z/SH9D+xmh34CmnTdEgJvdFwqCOhHooGcG/iegggtS6F9++EGYHYNWSAighQfCt5hlG4LohYeFRPfeeCaWxWGHLXrnGHcYopeebSgSFWOCItrxYIFt7djUizDeWN2DPv4oZJFQoUYkk8Ap2SQdSLLxpE1XVrGdlCTW0SNVS/qU44VGjghkEhrGMiZJWWZYJhYrPtElLGuK1KabXcQp24x0hnnTnXia+SKgu73pIqFT4DYnnHVq56dMi4JpqHttIurbpEqlOcdshFq6SKMXnbmpa3zyBWofp04kKpVhlsoipqKkCtGqXrb6n6eH4KoRrbUuqWuIj9IG60ya4oHgr0Qg6+iwMUVqLKnBJhqtcNOC5Goezu7J7GSyJrltS8pqeS1+zFXrm5jdOheuqeYa6FW6aK575Lfu7gEvmfcySm+9z7Y7Wrb2+cuvXPkCW7C+Uw5cnMAIy0vwvgrL4TATxToyccSBhnfxwwljbC+8vFp8sMc6MiztuMJ2TLLGEHMbciQjryzEqTVGFvPKF3+JycYyU2yyui+31nLP6v1MI8A734yz0fgqbSPResiLsoxMQ32yyjZivQnPVjdt5dQL7+g0yXUiPV3FS3Dd9YRDC2r2qPrlNjbZVQP9thtKpq322iVrnYaecC+KdoN7822w338DXi7AUhrOctRgFy2Yg39USVzMd7+6b9zYclk3SzcPPu/Qivfq+dyzOp35v5/jfXrQh7b9tYSFa7464bVjhDrukpd2+9G7K7T7rcFrq2juFQ3fX/FyRi5u6yEFXx/ybsuuN/QfSf8z9fQ53z32HWlvfRPM+6wr9w6JjziP43fuIfoMwY+v5oXmKL/w4EMZ2P2Ull1+XahrjvcIMcDRvYV/MzNXAZeVv8MdsIH9W1/zEAiFvVGwIAvMSrQyGLb25el/eoHd4iR4PRA2jYSJg6BFuOS68f2ugygciwpX6Lk1QMuEbBvZBa/CwhSW7oT182DWEJO3IL1uh+RDIBJV9UL2HRFmAZwhSprIpBqmjIExzAsVP8i5SShPiFHhoDC+CMYhLfFSWZQYDiVyxtAUb41slGInmNdGGspxa3eM4MDgyMBc8fEhdfxQGW2YxykW0neHrGAiS/JHVIGwkelbJBQfCcn4SZJaOKzkQjTpLTBuUX/uCqQfntRFA/KLk2rc4ICidMnotdKPx1slK9PoF1QmkUCK1E1afmXLg/QSeEW0Gy2Bmcph0uWXfTvilD7ptWKe8pWsU6Yso8mqQWYKmt8TXQ6nSc3APdOaLBPj4USYMUkZ84HgrCYzt5lO3nmzXpUk58faqUd4YjOX4nxc4M4ZO36G854lNJ096UlIUSarW8g0C0DNR9B3NXSC/uRIQ+Fo0Pm9E1LbWyjQvCirhGpjPQatKDHNSZPpadSiQntoQIlltEyeNIIRBWWzWkrJl9azhTHNyPJsmkCVFtOnySwp02qa01FKjaft2ClQXVZUo6JIpOhQ6lJPhNSrNZWhWKra/zza07px9aNa5elXcfdQqEY1rDYdK1npadaz+rR8al2rAvM5EtqJ9aoE1Kbc9Aour8YVjd4LZlb9OlViSPOHNbFrVZNz2MXO432OZezrrALZyEpWZ8esbGEdR4un/pWzjlwqXUF7DGWNlrTG4CVfUeuM88mTtcvwFFZOC9tgmOcrtE3Za2uLz3Tu8rPj5CZvG4ZXt+Q2EVYcbjatOZd1Bux0yiVuTiWzWkx+BrPR7a0Hr7vb526uutllp68Og1jAuum4sAVvMlFYXje6UL3hDS5M04hd98bUubwVIXzFW1Fdore2T1xud/UZTbySFroFttw8r9rWMAqWqj8KbXGBCxPhZq1m7gNng+NrYdMZmMKsxZzANhzfkWb4wyA+8CU7lWLOwm9Lli3xSiE34hY77r/7ayeJZXzQg93WxobDb44NbDAe2wzH2RyikRFpQZpudsky3O+QZwnlpEm5m6a8XpWRO2BBzdJvO45ue/fauC93TMhb/qnYlMmxDqcZlipqLJF7XMo3X0fOZTbzle3sVATD1Iho5jONH2xVQaeWcm4ztDzCrGiqzbnRzWA0pDMB5EmnqNKWHgSmMx2ITXO6cp7+tIRFnY5Qk3rQpz6HpFNtXVaXw9SuFmisxQHrWTvT1uCoNa5HuOtv6LrXs3s0sHPx62H70NjbKDayObbsbCi72VmGNjWeLW2mVrsa1L42F4WtbVdku9taQDK4ZbHnceOivuYeY4TTDYx1s7vdbn53L8Ys73rb+974zre+983vfvv73wAPuMAHTvCCG/zgCE+4whfO8IY7/OEQj7jEJ07xilv84hjPuMY3zvGOe/zjIA+5yEdO8pKb/OQoT7nKV87ylrv85awOAg==","widgets":{"bug":{"type":"canvas","size":[21,17],"pos":[89,204],"locked":1,"animated":1,"script":"on view do\n each in range 3\n  if !card.image.copy[me.pos+gamepad.dir me.size].hist[36]\n   me.pos:me.pos+gamepad.dir\n  end\n end\nend","border":0,"image":"%%IMG3ABUAEQZAgHBILAaOxSQAuQyAngHl0Ak6Pq9VKbWKxUaT2233Oz2az+Kvucumqtlw6DsOJ7u9cTuenhWGq2JjU3yCRIFXd2SGaIxRioZGflJTkZNB","scale":1}}},"d":{}}

(There's a lot more this would need to make it feel good to play, like giving the bug animation, a sense of velocity and weight, allowing it to "slide" past walls while touching them, a smaller bounding box, etc.)

(+1)

I understand, I will try my best to make it!

(+2)

Hi all! I've been building a visual novel in Decker using the Dialogizer module for the past month and it's been a great experience, but I've run into a sudden and unexpected problem where none of my "sleep[]" functions within cards seem to be firing properly any longer; I'm not sure what I might have done or what elements might be clashing to cause this. I'll give an example of the usual code structure I'm using on individual cards below:

on view do   
    dd.open[deck o] 
    dd.say[source.value] 
    dd.show[0] 
    sleep[30]  
    dd.show[1] 
    dd.say[source2.value] 
    dd.close[]
    go[drawer2 "Dissolve"]
end

While this string was working fine for me when I first started creating the deck, now Dialogizer simply fires immediately to "source2" after playing "source" without pausing as I would expect it to in tandem with the "dd.show[]" command, and it's a problem that persists through the entire deck anywhere I've used "sleep[]". Has anyone encountered an issue similar to this before or know what might be causing it?

Developer(+1)

Is it possible you've named a card "sleep" or defined a function in the deck-level script that likewise shadows the built-in sleep[] function?

Normally if you type "sleep" in the Listener and evaluate it with shift+enter you should see a response like

on native x do ... end

If it's being shadowed by a card you might instead see "<card>", for example.

(+2)

YEP, that was the problem, I had named a miscellaneous card "sleep" without considering the ramifications - thanks!!

(+2)

Hello! For Decker Fantasy Camp, I've been trying to make an old-school dungeon-crawler game. I don't have much programming experience, so this project is more to teach myself how to use Decker than make a good game. With that said, I think so far I've been learning pretty quickly.

I figured out how to use checkboxes to make a simple "turning and walking" system. You click on the up button, and if you are not already facing north, you turn north. If you are already facing north, you go north one card. I wanted to add a compass to make it easier to tell what direction you are facing, and here's where I'm running into trouble.

I wanted to make the compass a contraption that way I can simply copy and paste the contraption to each of the cards rather than needing to constantly copy and paste the same four compass canvases over and over. I made my little canvases to go in the contraption, copy and pasted them into the contraption, but they don't seem to be showing up the way they should. I was trying to make one of the canvases visible depending on the direction the player is facing and hide all the others, but changing directions doesn't seem to affect what canvases are shown or hidden at all. If I set the canvases to hidden in the contraption they stay hidden no matter what buttons I press and if I set them to visible they stay visible no matter what buttons I press.

Anyway, here is the code for the contraption. 

if deck.cards["f"].widgets.face_north.value=1
 compass_neutral.show:"none"
 compass_n.show:"transparent"
 compass_e.show:"none"
 compass_s.show:"none"
 compass_w.show:"none"
elseif deck.cards["f"].widgets.face_east.value=1
 compass_neutral.show:"none"
 compass_n.show:"none"
 compass_e.show:"transparent"
 compass_s.show:"none"
 compass_w.show:"none"
elseif deck.cards["f"].widgets.face_south.value=1
 compass_neutral.show:"none"
 compass_n.show:"none"
 compass_e.show:"none"
 compass_s.show:"transparent"
 compass_w.show:"none"
elseif deck.cards["f"].widgets.face_west.value=1
 compass_neutral.show:"none"
 compass_n.show:"none"
 compass_e.show:"none"
 compass_s.show:"none"
 compass_w.show:"transparent"
else
 compass_neutral.show:"transparent"
 compass_n.show:"none"
 compass_e.show:"none"
 compass_s.show:"none"
 compass_w.show:"none"
end
Thank you for any help you can give, and I'm sorry if my explanation isn't very clear. I'm still very new to Decker and programming in general.
Developer(+1)

Here's a somewhat more compact approach that is roughly equivalent to your script:

dirs.face_north:compass_n
dirs.face_east :compass_e
dirs.face_west :compass_w
dirs.face_south:compass_s
 
each canvas name in dirs
 canvas.toggle["transparent" deck.cards.f.widgets[name].value]
end
 
compass_neutral.toggle["transparent" (!sum "transparent"=(range dirs)..show)]

If you want your contraption to update in response to a change in state elsewhere in the deck, you will need to somehow notify the contraption of that change. There are a number of ways to accomplish this. For example, if you wrapped the script you describe in an "on view do ... end" event handler defintion, you could also expose a way for code outside the contraption to fire that view event:

on get_update do
 view
end

And then fire it from the outside when appropriate:

mapArrowContraption.update[]

You could alternatively make a widget inside the contraption "animated" and use the view[] event that fires at 60hz to poll for changes to player direction on each frame, but this type of polling approach should be used sparingly; if lots of contraptions work this way it can add up to your game doing quite a bit of redundant work every frame!

You might also find this thread relevant.

Does any of that help point you in the right direction?

(+1)

Yeah, that worked! Thank you for your help!Although for some reason the compass contraption is only updating when I click the direction buttons twice.

(+1)

Hello! I'm here to ask about grids again.

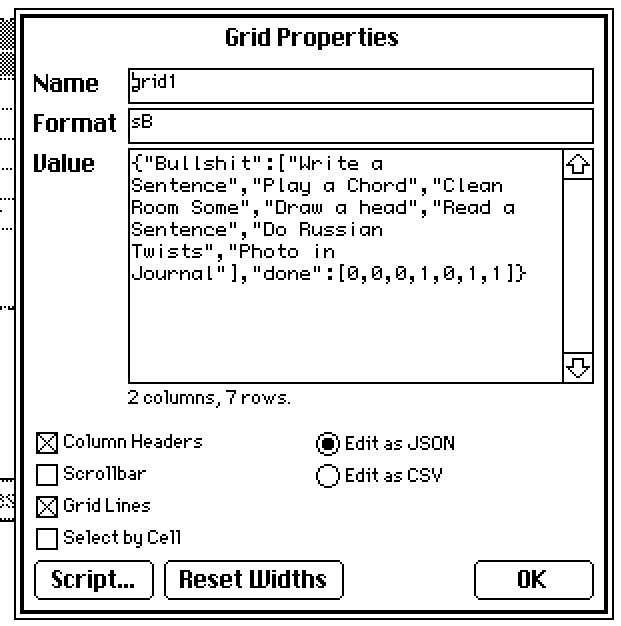
I've got the grid set up as one of those check mark booleans cuz I like the look of it and you can just double click it, but I couldn't figure out how to make some code that can set all of the checks to false / 0 for me. Trynna make a little button that can just wipe the slate clean for a new day.

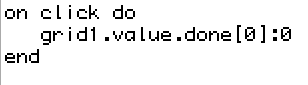
this is my best attempt at getting a checkmark  to change, but it doesn't do the trick as is.

Developer(+2)

One way to set an entire column of a table to a numeric value is to perform an assignment like this:

grid1.value.done:0

This expression produces a new, updated table. If we want the change to be reflected in the grid, we need to assign the result to the grid's .value attribute, so our whole "clear tasks" button script might be

on click do
 grid1.value:grid1.value.done:0
end
(+2)

Thank you, it works now! I'm gonna keep fooling around with it to try and make sure I've got it down.

Viewing posts 41 to 60 of 73 · Next page · Previous page · First page · Last page