thanks a lot
TahaMohamed
Creator of
Recent community posts
Sorry for the confusion you got , but android not currently supported (android icon in texture i will remove it) , iam planning to - to be honest- until we reach the perfection it will be easy to remap it to android and wont take long (same code base just gui changes) !! For now: try desktop version and tell me what you like and what needs improvement. I will be more than happy to deliver it to you.
Thank you for your interest i really appreciate it , have a nice day
Modeling:
- if you ever found ugly faces (holed or overlapped) try to run "rewrite normals" from left-click menu and usually it will fix this.
Texturing and unwrapping:
- Texturing game assets is tricky part and needs your focus, if u need optimal performance you use trimsheets for most of your props, and if you making stylized art and need to make all details in one texture for lots of props then Texture Atlas is the way (combining all uv maps of group of objects together in one texture and one material also to reduce cpu draw calls) but avoid ceiling 2k textures on old gpu and 4k at max on moderate gpu not to bottleneck it.
- Unwrap before any deform-sculpt or subdivide modifier, it is easier to control and uv data wont be affected later !
- Morgana 3D app can actually bake Ambient occlusion in vertex color mode which doesn't require a texture nor UV unwrapping at all !
- Modifiers like Box deform, cylinder deform in morgana 3d can actually twist your model and bend it by moving rotating selected vertices !
- In Morgana 3D you can bake Global illumination as vertex color also (the more your model is high poly the more it looks great -depending on vertices around)
- In Game Dev : Always use texture atlas(multiple textures in one image under each other or beside each other) in uv map for things that are bigger and takes a huge part from screen then make you uv island repeat around it (unwrap outside uv canvas).
Hello,
if you are a maya user or blender (with idustry standard shortcuts) then you already know how to use morgana !
Viewport
control viewport through navigation cube and ALT+Left click.
F - focus on selected mesh/curve
Shift+ Gizmo Drag >>> Duplicate object, also CTRL+D
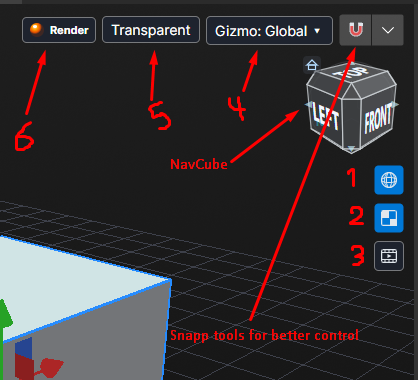
1-Hide/show your mesh wireframe.
2-Hide/show viewport textures
3-Hide/show Animation Timeline
4-Gizmo orientation
5-Transparent mesh (selected only), if you want to model on reference image.
6-Render in viewport directly (Just to showcase your model)
-----
Modeling:
Use keys to move between modeling modes (1-vertex, 2-edge, 3-Face, 4-Object again, 5-rig if you have bone modifier)
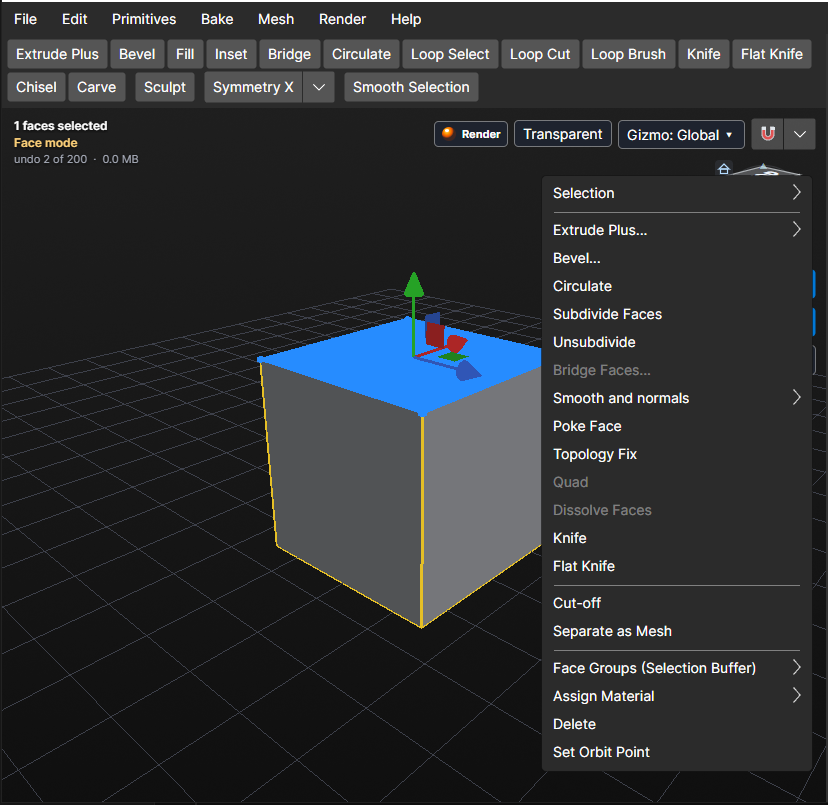
Every mode has its own right click menu and top toolbar
Double click face/edge to loop select (based on your mouse direction)
Press arrow key to grow selection in direction (TIME SAVING).
Press tab to select whole connected part of mesh, or area marked by seams
Now lets talk about face mode tools,
Face Toolbar:
Extrude plus: extrude face in direction its pointing to (Normal)
Bevel: make face top a smoother look
Fill: if you have a whole in your mesh thats what fixes it the correct way (clean topology)
Inset: inner frame selected faces / makes new face inside it
Bridge: if you have two faces/edges you want to connect them with topology/ if they are both on mesh and connect through it , bridge will simply make a hole and that is useful sometimes.
Circulate: select a face and start moving with mouse to make it like a circle (based on face edges of course, the more the smoother it gets)
Curves:
- A curve in viewport can be double clicked to open in Curve Maker for further edits !!
- Curve maker can make alpha shapes for texturing (also you have bool operations in it !!).
Unwrapping:
- Unwrap button when used for selected faces with no seams at all it will act as iron/flatten and directly unwrap your selection.
- Keep important areas of your model always big in uv (texel density) to have the best resolution in rendering inside game.
Texturing:
- Fill it, bakes (seam, hard edge, direction bake) >> they all depend on your paint brush parameters so always keep an eye on it
- Fill it works on masked area and selected layer altogether so keep an eye to your limits when filling.
- Fill it also limits to selected faces in edit mode directly
- If paint tab is open: Just press 'e' to erase mode for any selected brush.
- If paint tab is open: Just press F to stamp your brush directly to selected edges in edit mode
- Spicy generators (clouds, noise, metal....etc) can really be used one after another to create your own textures.
- use a patterned alpha with fill it (on masked area or layer) to make your texturing cool.
- For pixel art and PSX-Art lovers we have two options: either you use pixel brush to draw pixelated strokes, or you draw normally then use layer effect "pixelated" which makes all magic for you ! you can also export texture as pixelated and lower resolution with no smooth filtering as final option.
- Seams bake works based on your unwrap islands (island edges), while hard angle bake works on angle limit you choose as your max limit.
- Direction Bake is a great tool if you want to add snow on top of object (like house) , or want to make down dirt for a barrel or something, all limited to your imagination only.
